Welcome to Zen_ar218's blogspot.

December 31, 2008

Using Lightbox to Make Your Website More Interesting

Using Lightbox to Make Your Website More Interesting

Now a day, many new websites are using lightbox effect for doing gallery or just using on the images with in the content.
If you have no idea about what lightbox is? just click on this sample picture below...

Sample of Lightbox


It looks very interesting, Right? Okay, I will tell you how to do it!

Step 1. Firstly, You have to go to this website. And download lightbox.(Zip file)
http://www.huddletogether.com/projects/lightbox2/

Step 2. After you get the lightbox2.04.zip(Zip file) on your computer. Extract it!

Step 3. You will see the folder name lightbox2.04Open it and there is the index.html which has the instruction there. If you understand it clearly, No more reading here! But if you don't, You might follow my next step. :)

Step 4. For understanding how to use it. You might have to prepare 3 sample pictures(or more). And just name them as picture01.jpg, picture02.jpg, picture03.jpg

Step 5. Resize them and name them as picture01-thumbnail.jpg, picture02-thumbnail.jpg, picture03-thumbnail.jpg
Here you get 6 pics: 3 pics in the full resolution and 3 pics are the thumbnail. Put them all in the same folder. (for this example I use the folder name example-pics)
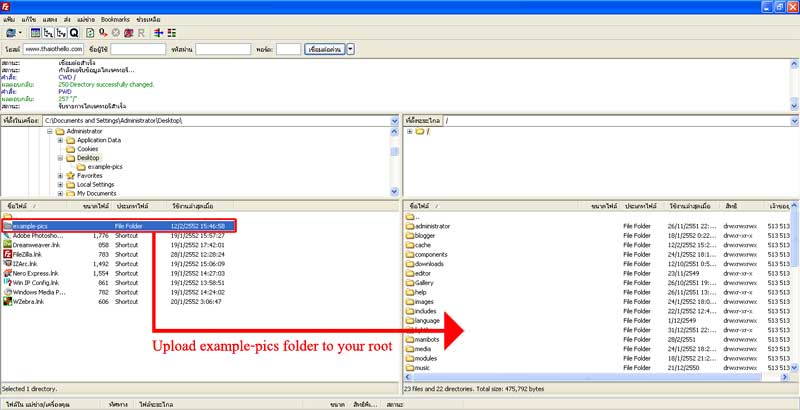
Step 6. Upload the example-pics folder to your website. I assume you upload to this location.
Root/example-pics
lightbox

The picture shows how to upload the example-pics folder to your website by using filezilla


Step 7.Back to your lightbox2.04 folder , I recommend you to rename the folder name to be lightbox
Step 8.Upload thelightbox folder to your website. I assume you upload to this location.
Root/lightbox

Step 9. Okay, put this code in your template html between your <head>...</head> tag.

<link rel="stylesheet" href="Your Website URL/lightbox/css/lightbox.css" type="text/css"
media="screen" />
<script src="Your Website URL/lightbox/js/prototype.js" type="text/javascript">
</script>
<script src="Your Website URL/lightbox/js/scriptaculous.js?load=effects,builder" type="text/javascript">
</script>
<script src="Your Website URL/lightbox/js/lightbox.js" type="text/javascript">
</script>

Don't forget to change Your Website URL in the code :)


Step 10. And when you want to use the lightbox just use this code

<a href="Your full resolution picture url" rel="lightbox" title="your title">
<img src="Your thumbnail location url" alt="your title" /></a>

For this example (6 pics which you prepare on Step 4-5) the code should be:

<a href="http://www.yourwebsite.com/example-pics/picture01.jpg" rel="lightbox" title="picture01">
<img src="http://www.yourwebsite.com/example-pics/picture01-thumbnail.jpg" alt="picture01" /></a>

<a href="http://www.yourwebsite.com/example-pics/picture02.jpg" rel="lightbox" title="picture02">
<img src="http://www.yourwebsite.com/example-pics/picture02-thumbnail.jpg" alt="picture02" /></a>

<a href="http://www.yourwebsite.com/example-pics/picture03.jpg" rel="lightbox" title="picture03">
<img src="http://www.yourwebsite.com/example-pics/picture03-thumbnail.jpg" alt="picture03" /></a>

Step 11.Open your page and see the lightbox sample :)

Sample of Lightbox


Note:
  • If you have a set of related images that you would like to group, You should put [groupname] after the code rel="lightbox[groupname]". It will allow you to use arrow key on the keyboard for moving to next or previous image.
  • You can apply this method with photoshop automate web photo gallery.


Webmaster of Thai Othello Page

Read more...


December 21, 2008

Use Module Class Suffix to Change Modules Styles

Use Module Class Suffix to Change Modules Styles (Joomla!)

Have you ever wanna change some of your module styles to be different from others? Sometimes your website might look boring, If all of your modules look the same. This introduction will give you an idea how to change module style which joomla call module class suffix.

Joomla 1.0.x

Step 1. You have to understand CSS that styling your modules. Open up your template CSS (Template_CSS.CSS) and look for this...
  • table.moduletable This one will style the whole module.
  • table.moduletable td This one will style the module content.
  • table.moduletable th This one will style the module title.

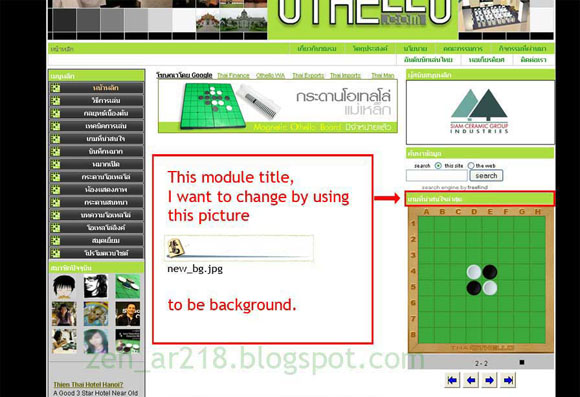
Step 2. Okay, Now I will show you how to change module title style. Firstly, prepare your picture to be module title background. (The picture dimension that match your template depend on your CSS.)

Module Class Suffix 01


Step 3. Upload your new background of module title to the location

URL = Root/Templates/Name of Template that you are using/Images

Module Class Suffix 02

This is an example of my new background and I upload it to that location.


Step 4. Go to Your Template CSS and Looking for table.moduletable {

table.moduletable {
width:100%;
margin-bottom:5px;
border-spacing:0;
border-collapse:collapse;
padding:0;
}

table.moduletable th {
background:url(../images/subhead_bg.png) repeat-x;
color:#FFF;
text-align:left;
padding-top:4px;
padding-left:4px;
height:21px;
font-weight:700;
font-size:12px;
text-transform:uppercase;
}

table.moduletable td {
font-size:12px;
font-weight:400;
margin:0;
padding:0;
}


Insert this code after the code above
table.moduletable_shogi {
width:100%;
margin-bottom:5px;
border-spacing:0;
border-collapse:collapse;
padding:0;
}

table.moduletable_shogi th {
background: url(../images/new_bg.jpg) no-repeat;
color: #336699;
text-align: center;
padding-top: 15px;
padding-left: 4px;
height: 51px;
font-weight: bold;
font-size: 12px;
text-transform: uppercase;
}

table.moduletable_shogi td {
font-size:12px;
font-weight:400;
margin:0;
padding:0;
}


Explanation of my CSS code above:
  • I put the name _shogi(Japanese Chess) after table.moduletable to define the name of my new module class suffix. You can use any name that you prefer.
  • At my CSS code background: url is to specific the location of an uploaded picture.
  • You can adjust height, text size, text color as you prefer
After insert the code above, It will look like this:
table.moduletable {
width:100%;
margin-bottom:5px;
border-spacing:0;
border-collapse:collapse;
padding:0;
}

table.moduletable th {
background:url(../images/subhead_bg.png) repeat-x;
color:#FFF;
text-align:left;
padding-top:4px;
padding-left:4px;
height:21px;
font-weight:700;
font-size:12px;
text-transform:uppercase;
}

table.moduletable td {
font-size:12px;
font-weight:400;
margin:0;
padding:0;
}

table.moduletable_shogi {
width:100%;
margin-bottom:5px;
border-spacing:0;
border-collapse:collapse;
padding:0;
}

table.moduletable_shogi th {
background: url(../images/new_bg.jpg) no-repeat;
color: #336699;
text-align: center;
padding-top: 15px;
padding-left: 4px;
height: 51px;
font-weight: bold;
font-size: 12px;
text-transform: uppercase;
}

table.moduletable_shogi td {
font-size:12px;
font-weight:400;
margin:0;
padding:0;
}

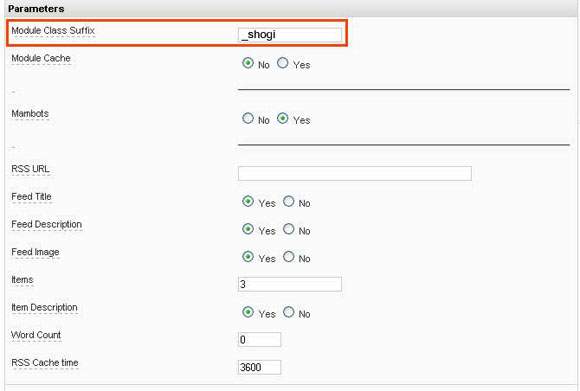
Step 5. Okay It is almost finish. Go to your module that you want to change the style,in the parameter Module Class Suffix just put the name _shogi (or your style name) in it. And then save.

Module Class Suffix 03

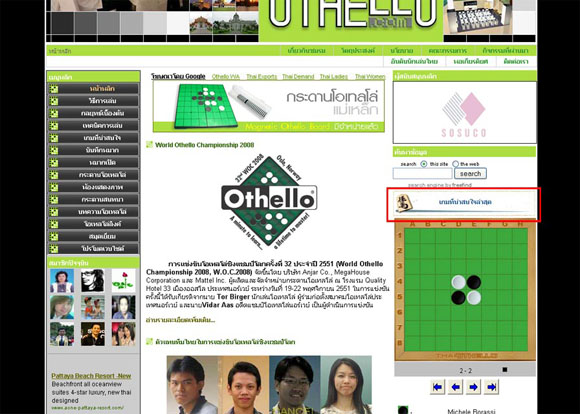
Finish Come back to frontpage and Let see your module title!

Module Class Suffix 04

Joomla 1.5.x
  • This example is from Joomla 1.0.x but if you understand it you can do in Joomla 1.5.x also.
  • Joomla 1.5.x will wrap the module with div tag(<div>...</div>) instead of table tag (<table>...</table>) so you have to modify div.moduletable instead of table.moduletable
  • To define module class suffix => div.moduletable_InsertYourStyleNameHere


Webmaster of Thai Othello Page

Read more...

December 20, 2008

Making Gif Animation by Photoshop and ImageReady

Making Gif Animation by Photoshop and ImageReady

There are many way to do gif animation. But I think using Photoshop and ImageReady is one of the simplest way.

Step 1. Make sure you have install Adobe Photoshop on your PC. Once you have already installed Photoshop, It will automatically install ImageReady.

Step 2. Prepare your pictures for making gif animation. I prepare this 4 pictures as show below.
making-gif-animation-01

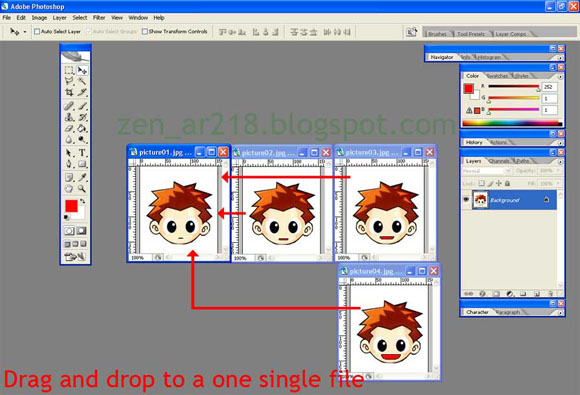
Step 3. Open all the picture in Photoshop. Drag and drop it into one file. (Hold shift button and drag, It will snap to the proper position.)

making-gif-animation-2


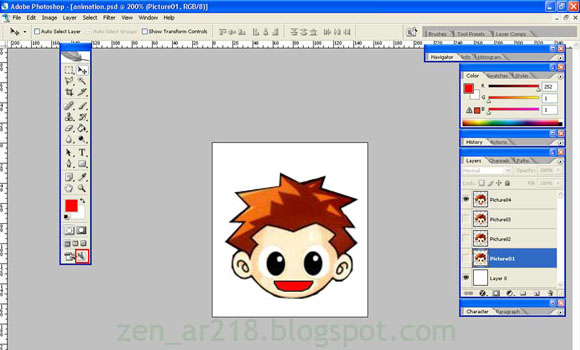
Step 4. Now all the picture are in one photoshop file and they will be in the seperate layer. And click to the ImageReady button (show below), It will switch to ImageReady Program. (Before you go to imageready, You might save the file first.)

making-gif-animation-3

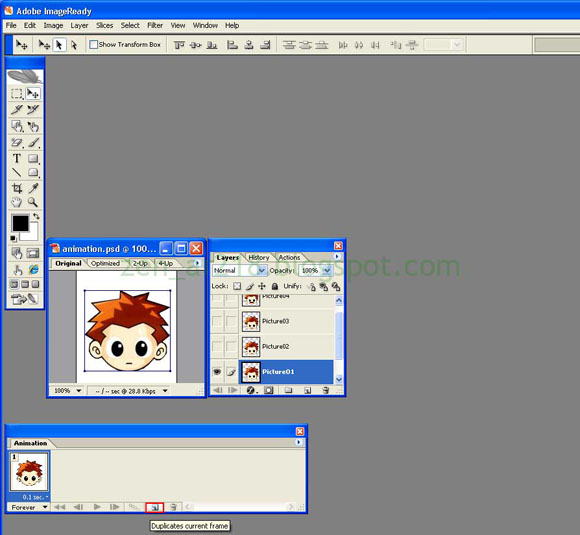
Step 5. And here you are in ImageReady program.
Open the Animation window (window=>animation).
Click on Duplicate button to copy the frame. (For me, I copy to 4 frame.)

making-gif-animation-4

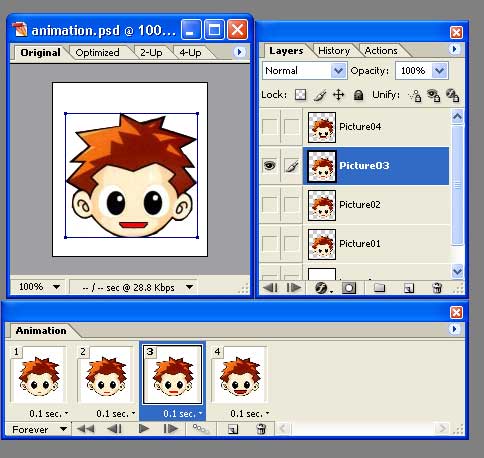
Step 6. Frame 1. Show only picture01 and hide other layers(click on the eye on the layer. Eye=Show layer, Blank=Hide layer), Frame 2. show only picture02, Frame 3. show only picture03, Frame 4. show only picture04. (You can preview by click on play button.) Adjust the time of the frame as you prefer.

making-gif-animation-5


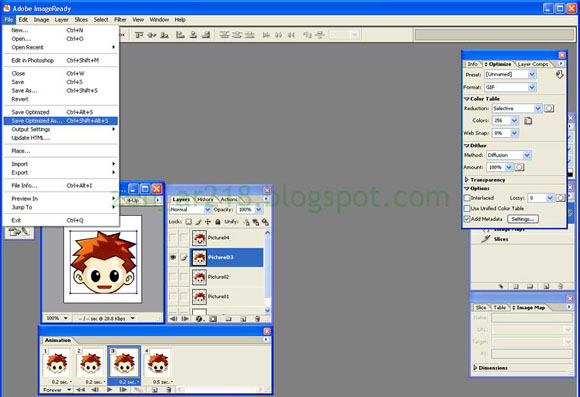
Step 7. If you finish adjusting your animation, Then click Save Optimized As. It will save to gif format.

making-gif-animation-6

Finish! Congratulation for you first gif animation! :)
making-gif-animation-7

Note
  • If you understand how to do it, You might making it in photoshop layer. No need to prepare 4 picture like I did in the step 1 and 2.
  • This Tips can apply for making banner and emoticon.
  • For making emoticon, the appropriate pixel is 50x50 pixels.


Webmaster of Thai Othello Page

Read more...


December 17, 2008

Insert Module into Joomla! Content Item

Insert Module into Joomla! Content Item

Have you ever want to insert your module like polls, counter, Google Adsense to your content? Here is how to do :)

Joomla1.0.x

Step 1. Go to Admin page and check your mambot and enable Load Module Positions. If you click into Load Module Positions, there are few setting here.
  • Published select yes

  • Styles In this field you can should whatever. It will create HTML tag wrap your module.(div tag <div>...</div> or table tag <table>...</table>) I recommended you choose raw output!

insert module in joomla content 01

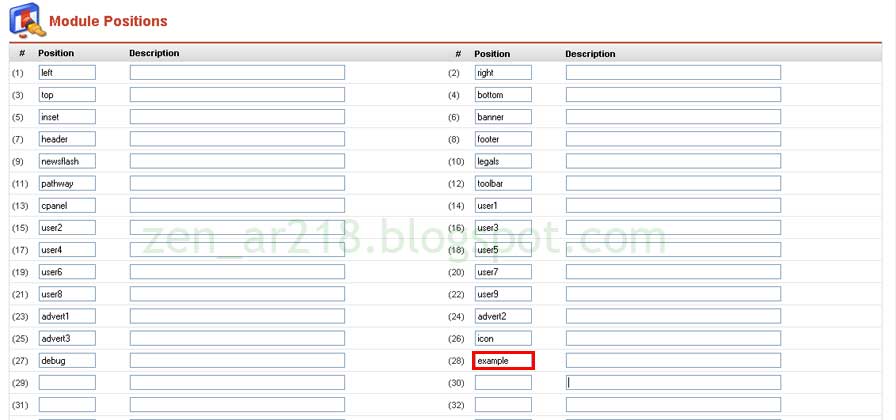
Step 2. Go to Site=>Template Manager=>Module Positions Create new module position just type anything in to blank field. (I type module position name example, you can see the picture below)


insert module in joomla content 02


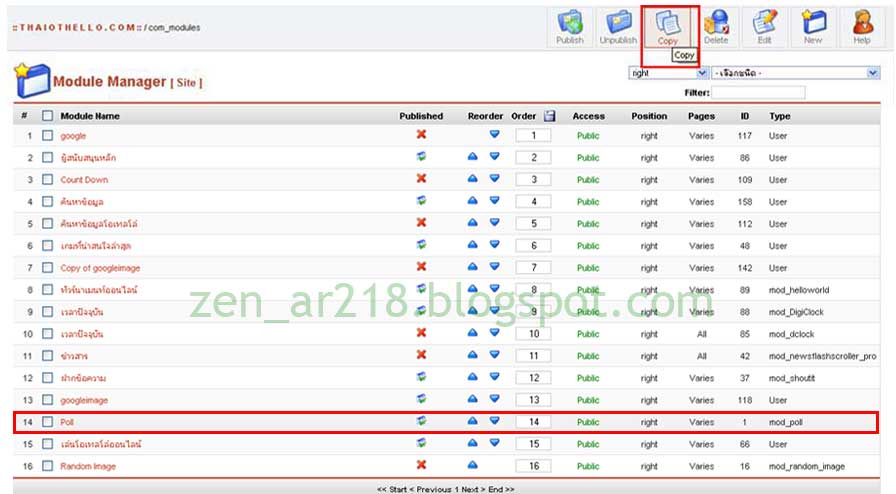
Step 3. Go to Module manager and copy which module that you want to show in the content or you can create new one. (I copy poll module)

insert module in joomla content 03

Step 4.
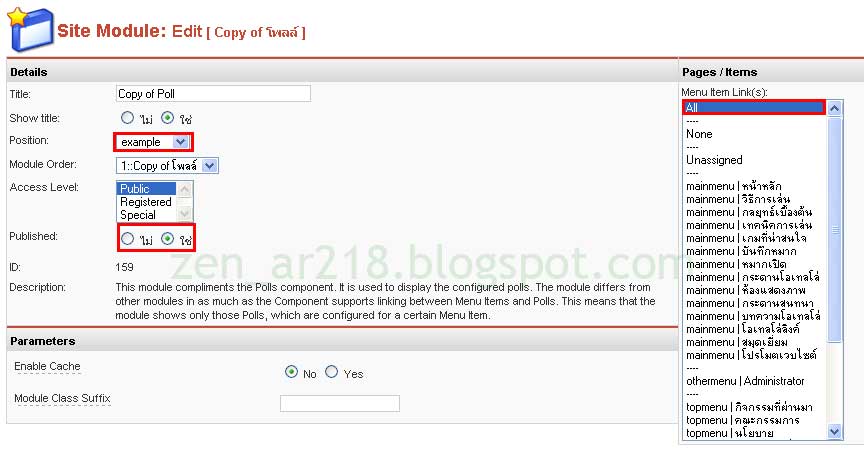
Click in to your copy module (mine is copy of poll) and choose position that you just created in step 2. Publish it and in the Menu Item Links: select All.

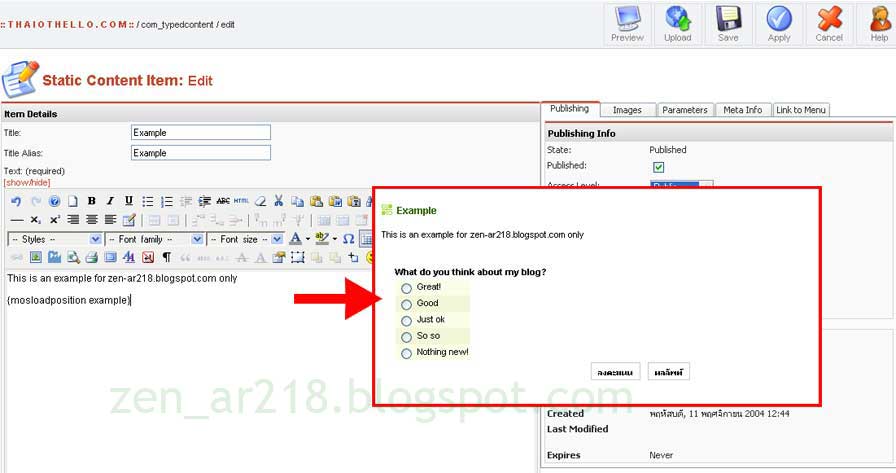
insert module in joomla content 04 Step 5. Create your new content and use this tag {mosloadposition yourmodulepostionname} (My module position name 'example', So I just type {mosloadposition example})

insert module in joomla content 05 Finish Now your module will show in your content item!!

Joomla 1.5.x:
  • Joomla 1.5.x mambot change the name to plugin

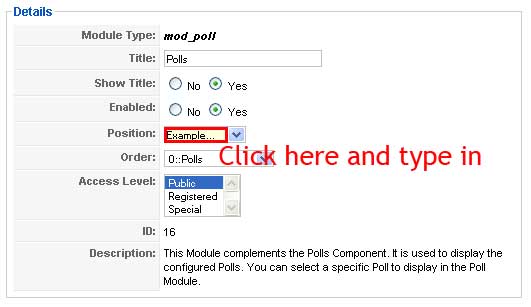
  • To create new module position, In your copy module setting just click at the Position dropdown menu box and type new name into it. (click on the box not on the arrow)

  • insert module in joomla content 06
  • Use this tag {loadposition yourmodulepostionname} instead of {mosloadposition yourmodulepostionname}


Webmaster of Thai Othello Page

Read more...

Open an External Page inside Your Joomla!

Open an External Page inside Your Joomla!

There is a Wrapper function in Joomla! which can let you open an external page inside your joomla page. This function is quite helpful. I will show you how to doing it.

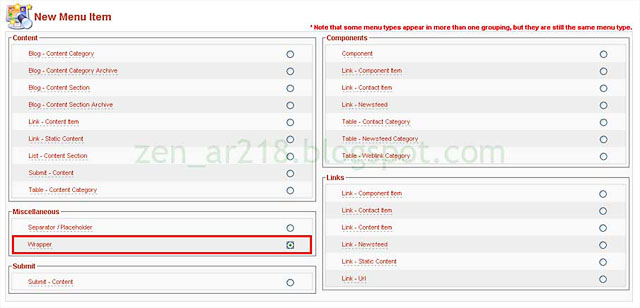
Step 1. Go to your Admin page=>Menu=>Main Menu=>New=>Choose Wrapper and Click Next open external page inside joomla 01

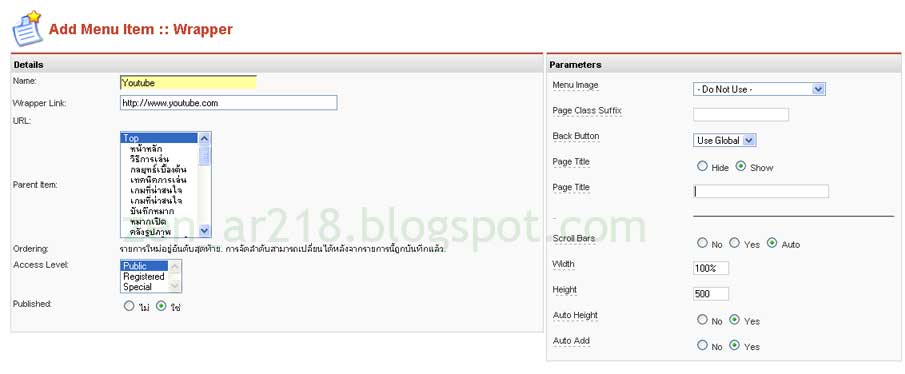
Step 2. Now you are in wrapper menu setting
open external page inside joomla 02

-Details

  • Name: Your main menu name
  • Wrapper Links: Put your external page URL here
-Parameters
  • Menu Image: Leave it blank(This function's not working)
  • Page Class Suffix: Just leave it blank. (This field can contain a suffix that is to be applied to the CSS classes of this page.)
  • Back Button: Show or Hide or Use Grobal
  • Page Title: Hide or Show your page title. (It will show on top of main body.)
  • Page Title: Put your page title here
  • Scroll Bars: I recommended you choose auto
  • Width: Type in a value for the width of the Wrapper window.
  • Hight: Type in a value for the height of the Wrapper window.
  • Auto Hight: Select whether Joomla! sets the height of the Wrapper page to match the original dimensions of the external web page it is displaying.
  • Auto Add: This feature is just to add http:// when you forget to type complete URL inWrapper Links: field (i.e. if you type only www.external page.com)

Finish. After you complete your setting then click save.
open external page inside joomla 03

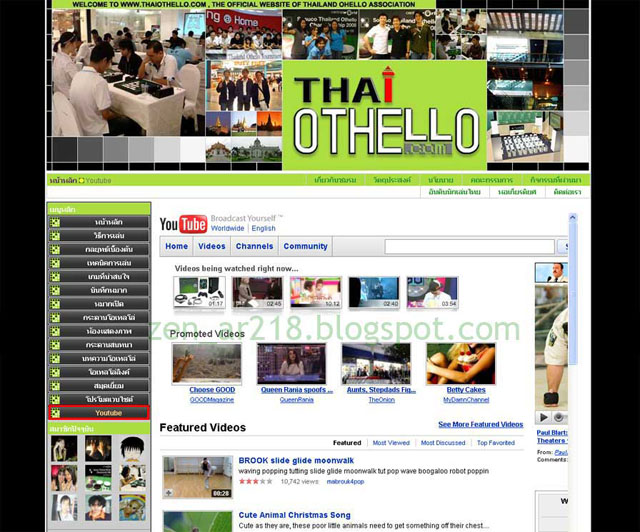
Youtube on my thaiothello page :)


Webmaster of Thai Othello Page

Read more...

December 16, 2008

How to Remove Community Builder Button on User Profile Page

How to Remove Community Builder Button on User Profile Page

If you use community builder extension on your joomla or mambo site. There is a community builder button on user profile page which link to community builder's team credits page. This button you can't remove it in its configuration. This article will show you how to remove it!

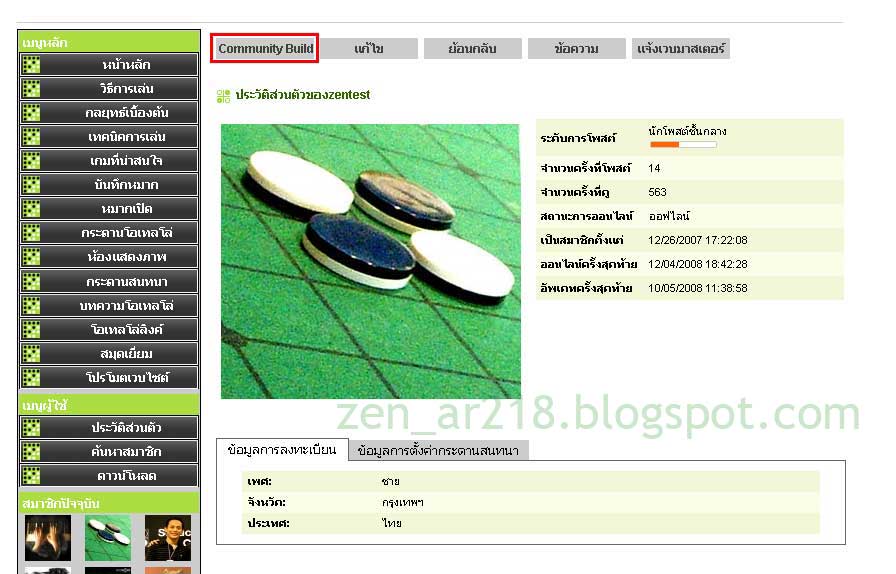
Community Builder01

This picture Show you where is the community builder button

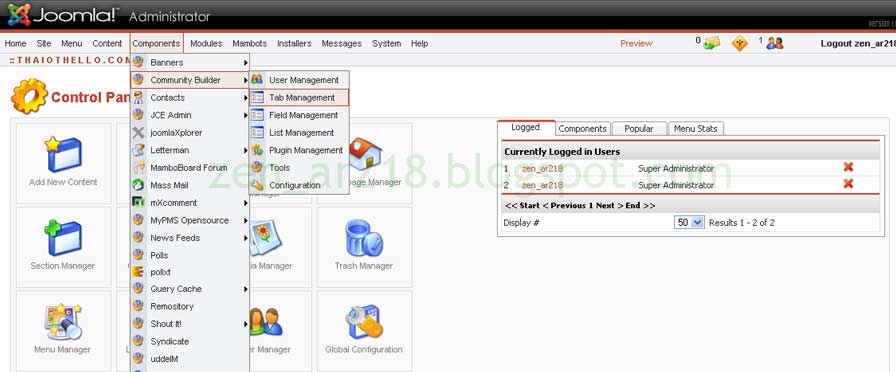
Step 1. Go to Admin page=> Component=>Community Builder=>Tab Management

Community Builder02

Step 2. On Tab Management, Click on Menu

Community Builder03

Step 3. You will see the parameters setting on your right hand. In the field first menu name:

_UE_MENU_CB just leave it blank. (see the picture below)

Community Builder04


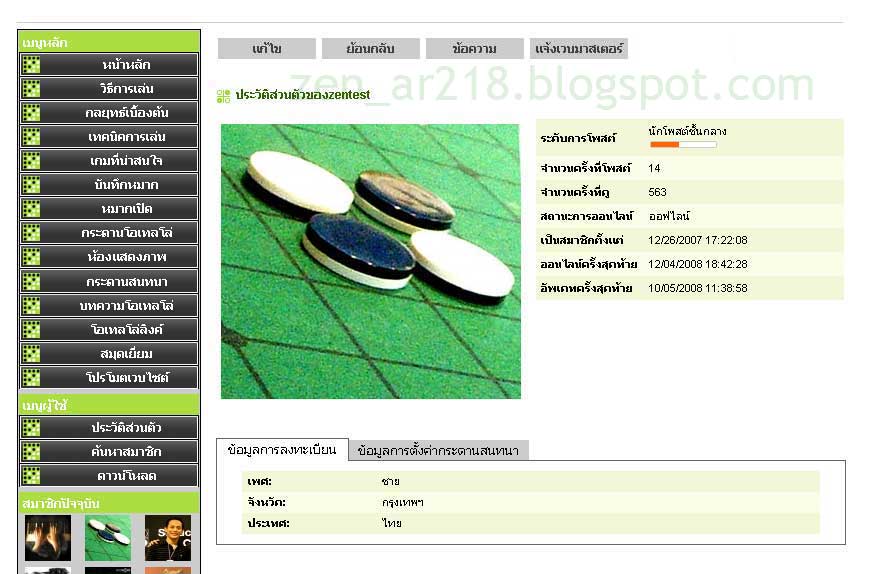
Finish. Just click save and then finish. You can check out on the user profile page. There is no Community Builder button now!! Community Builder05

No Community Builder button now!


Webmaster of Thai Othello Page (www.thaiothello.com)

Read more...


Automate Web Photo Gallery in Photoshop

Automate Web Photo Gallery in Photoshop

If you want to do the photo gallery in your website.
I introduce you to use automate gallery function in photoshop.
It is the easiest way to do, very fast and really save time!
here is how to do...


Step 1. Make sure you have install adobe photoshop on your computer. (photoshop 7 or higher is recommended)

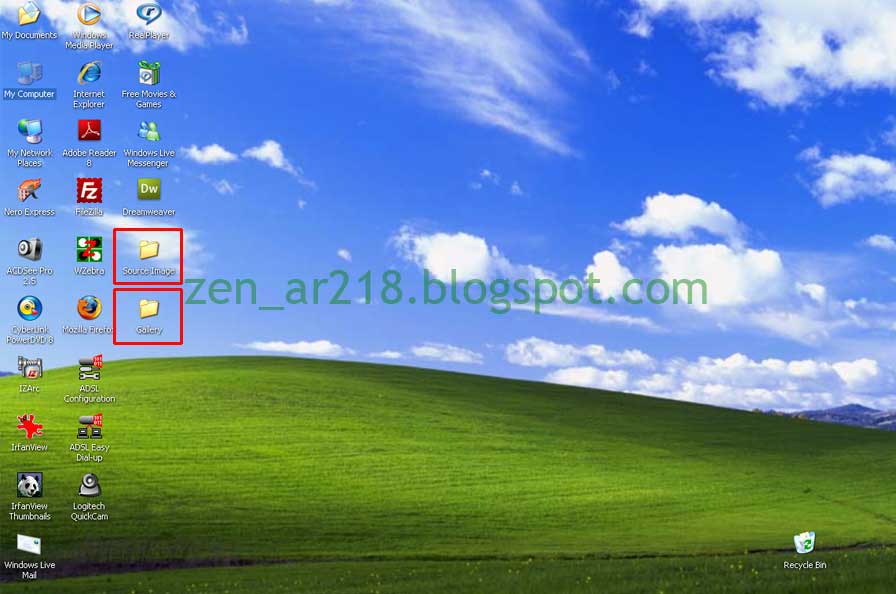
Step 2. Preparing 2 folders.
  1. 1st folder with include your images for doing photo gallery.
  2. 2nd folder for saving the files which photoshop will generate web gallery.

automate-gallery01

I prepare 2 folder which name Source Image and Gallery.

automate-gallery02


Source Image folder contain the images that you want to do the gallery. Gallery folder contain nothing inside.

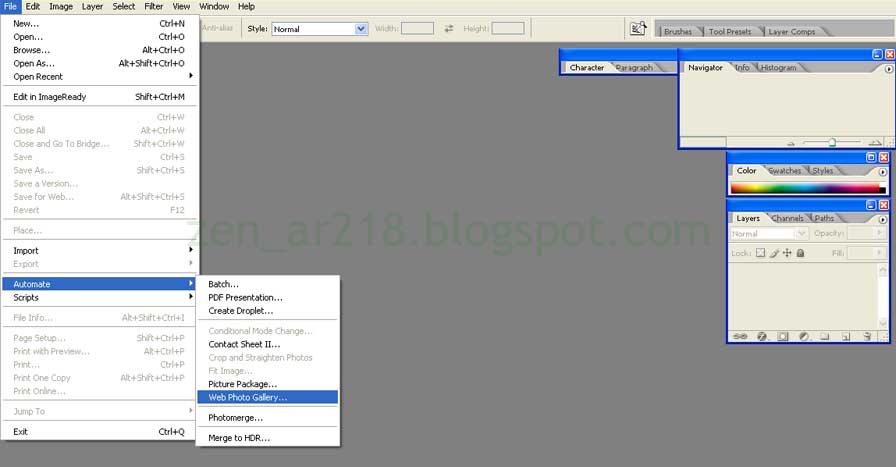
Step 3. Open Photoshop, Choose=>file=>Automate=>Web Photo Gallery automate-gallery03

Step 4. Now you are in the automate web photho gallery function which has many sub-menu.

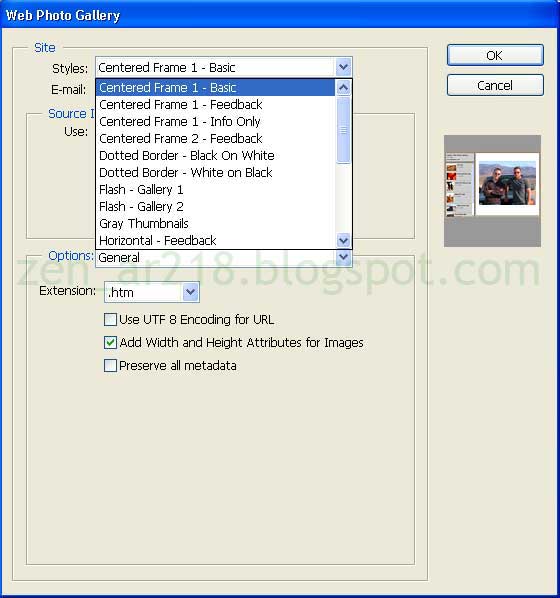
-Styles Menu:
choose the style of gallery that you like ( There are many style, you can try them all later)

automate-gallery04


-Email: Insert an email or leave it blank

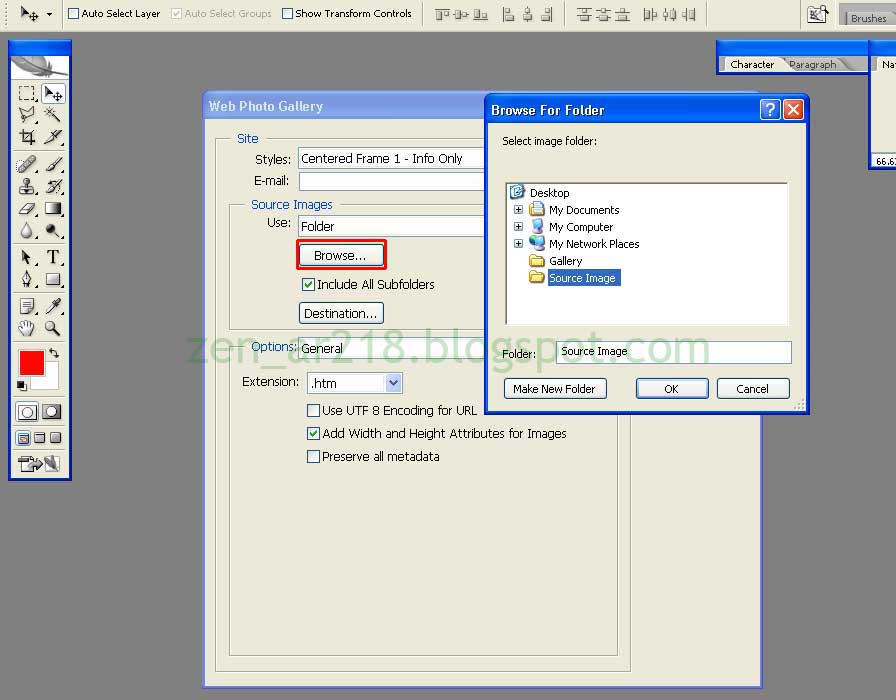
-Source Images

  • Use: Click Browse and point to your 1st folder (my 1st folder name Source Image) and then click OK.


automate-gallery05

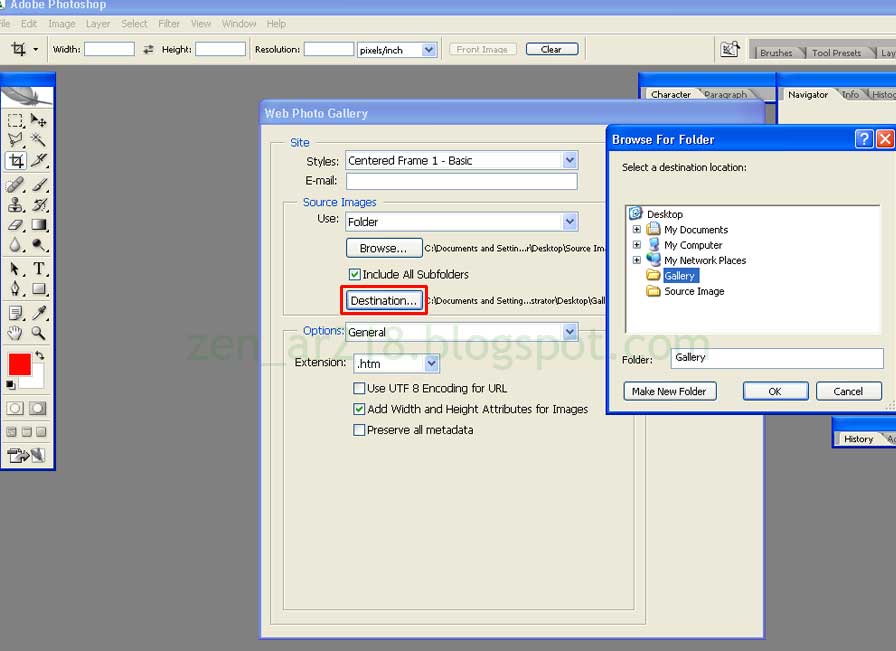
  • Destination: Click Browse and point to your 2nd folder ( my 2nd folder name Gallery) and then click OK.

automate-gallery06

-Option

  • General: export file setting
  • Banner: You can inset your site name, contact info, photographer, date.
  • Large Image: specific size and quality of large image in the gallery
  • Thumbnails: specific size of thumbnails in the gallery
  • Custom Colors: CSS color style of your gallery

Step 5. after you have satisfy your setting then click OK.

automate-gallery07


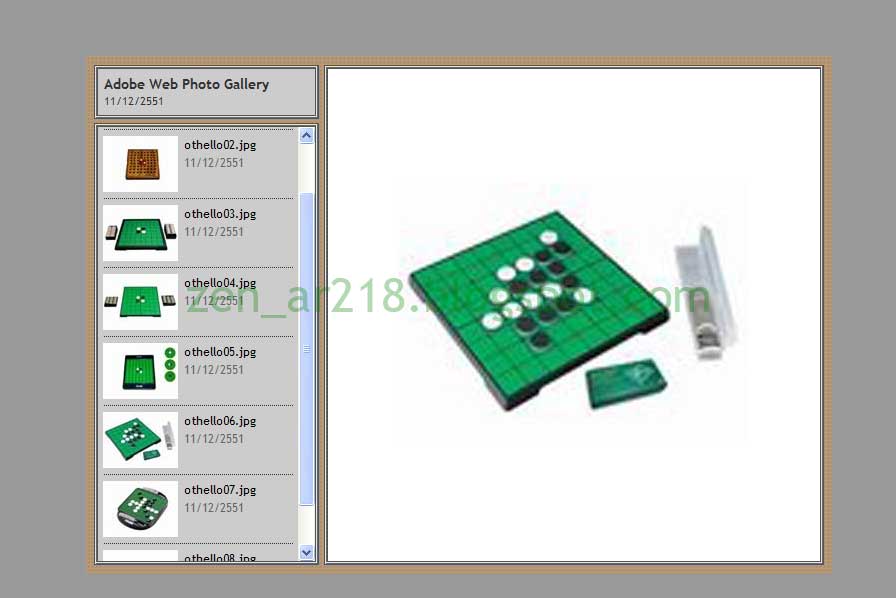
Step 6. Now, the gallery has created. But if you still don't like it, you can redo it all over again!

automate-gallery08

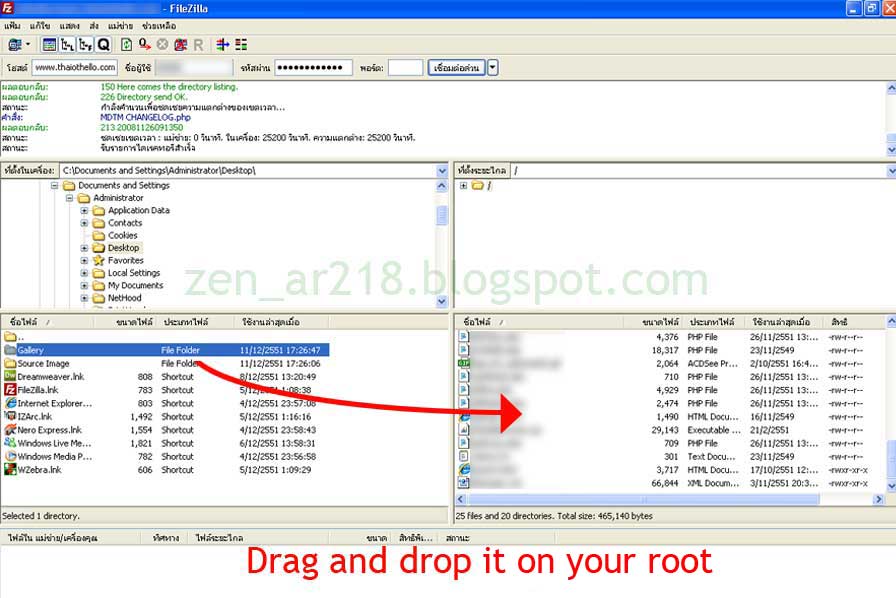
Step 7. Upload it to your website! using your favourite ftp program and then upload the 2nd folder(my 2nd folder is name Gallery) to your root.

Finish!!!


For this example, the URL to access to the gallery will be:

http://yourwebsite/Gallery/index.htm


Note:

  • If you already have the folder named Gallery in your root then you might change the 2nd folder name to whatever you want. (The URL to access to the gallery will change also)
  • You can edit the file index.htm in HTML to match your website, i.e. change header, footer.
  • You can edit gallery CSS style in the file name galleryStyle.css that locate in the sub folder name images.
  • You can see my live site photo gallery that using this method here:Example Gallery (more than 200 pictures but It takes only 30 minutes for creating :))


Webmaster of Thai Othello Page

Read more...


Frontpage Problem when Upgrading Joomla to 1.0.15

Frontpage Problem when Upgrading Joomla to 1.0.15

When I was upgrading joomla version from 1.0.10 to 1.0.15, I found this problem with frontpage.

All of my read more...button that should link to the article page, But it showed the article with all the module positions appear like a frontpage. What happened?? If you look to the URL from the picture below, you will see that the url show Itemid=1.


frontpage problem 01


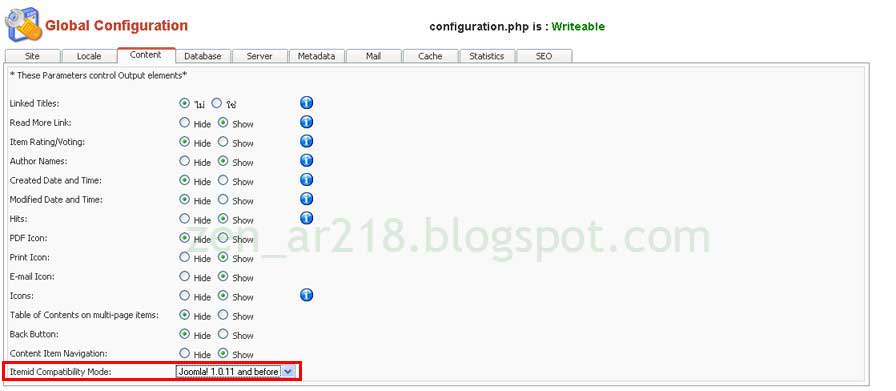
To fixed this problem, just go to Admin page=>Grobal Configuration=>Content=>Itemid Compatibility Mode=>Choose Joomla! 1.0.11 and before then click save button.


frontpage problem 02

This problem solved!


Webmaster of Thai Othello Page

Read more...

December 15, 2008

Edit Gif and PNG images

Edit GIF and PNG images

When you open the file within gif and png format in photoshop.

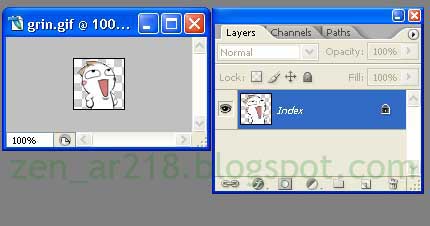
You will find that the layer is locked and can't open for editing.
If you get stuck with this problem. This little guide will show you how to edit them.

Step 1: Open gif or png file with adobe photoshop program.
You will see that the layer is index layer (locked).
And you can't do anything.

gif and png editing 01


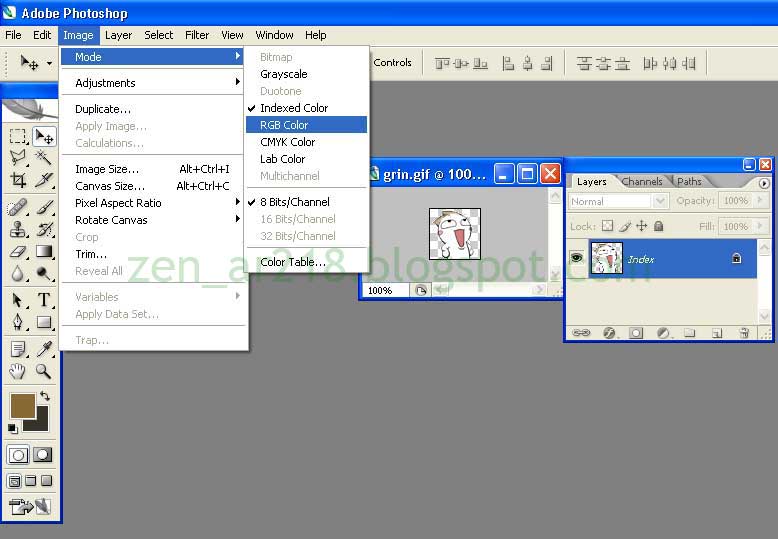
Step 2: To solve this problem, just go to menu Image=>Mode=>and Change from Indexed Color to RGB Color

gif and png editing 02

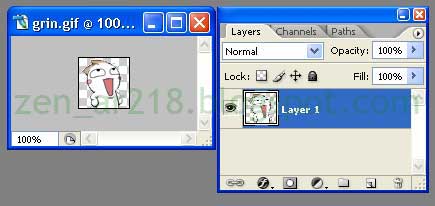
Finish: Now, the layer is not lock anymore!!!

gif and png editing 03


Webmaster of Thai Othello Page

Read more...

December 9, 2008

BBcode for Posting Image Link

BBcode for Posting Image Link

Now a day, many website allow only BBcode on the forum.

Many people know basic BBcode. They can use basic tag for posting an image, and link URL.

But, How about Image link? Can we use it??

Sure! I will show you how to do it!


1. Basic BBcode for posting image:


Example: My website logo, ehehe


The results:


2. Basic BBcode for posting link URL:


Example:


The results:
Thai Othello


3. And now BBcode for Image link:

Example:


The results:

Very easy, isn't it? :)


Webmaster of Thai Othello Page

Read more...

December 8, 2008

How to Insert Youtube Video Clip in Mamboboard

How to Insert Youtube Video Clip in Mamboboard

If you use mamboboard forum component on your joomla or mambo website. It can't post the video clip because it is not allow HTML only allow basic BBCode. This tips will show you how to insert my custom BBcode to put youtube video clip in mamboboard.

Step 1. Open the file smile.class.php and looking for this code on line 62


Step 2. Insert this code under the line above


Now, you can post Youtube video clip by using this tag.

[youtube]ClipID[/youtube]

for Example:

http://www.youtube.com/watch?v=ldMUEJBA1tk

If you want to post this clip in mamboboard just type:

[youtube]ldMUEJBA1tk[/youtube]

//*Red color font is what I called ClipID


Next step is to add the youtube video button for the easier to use


Step 3. Looking for this code in the file smile.class.php(about line 651)


Step 4. Insert this code under that line above


Finish! Now you add the button Youtube. When people click on it, It will generate tag [youtube]...[/youtube] automatically.

You can view the example on my website from the link below:

Example of Posting Video on Mamboboard


Webmaster of Thai Othello Page

Read more...

 
Copyright © 2008-2015 zen-ar218.blogspot.com - All rights reserved